$ MYSQL_PASSWORD=myPassword
$ history -d $((HISTCMD-2)) && ./show-grants-mysql.sh "-u root -p$MYSQL_PASSWORD"
$ MYSQL_PASSWORD=
Note the pasword doesn't stay in the history which is a wise thing to do.
Friday, September 28, 2012
Show MySQL permissions AKA GRANTS
Listing current permissions including passwords in MySQL can be easily achieved using show-grants-mysql.sh POB script, for example:
Thursday, September 27, 2012
Installing netcat in Solaris 10
Netcat or nc is the Swiss Army Knife of the Network-Security-Sysadmin Engineer. Here is a POB recipe I put together to ensure we push the package into our Solaris boxes.
In reality it is better to build a wrapper that will install any packages from sunfreeware. That is left to reader. Any takers?
In reality it is better to build a wrapper that will install any packages from sunfreeware. That is left to reader. Any takers?
Wednesday, September 26, 2012
Ubuntu Couldn't find your SSL library files for Monit
DevOps is I would argue used by many people in wrong terms nowadays (more on this in upcoming posts but be aware of the hype). In reality the Ops in the equation (meaning the sysadmin) should strive for identical Servers. Management through Recipes is the way to go, however many feel like a sysadmin should not code and that is wrong. The sysadmin should have nothing to do (probably) with OOP but with scripting and automation, that should be part of their daily work.
Today we got a weird error in one of the Ubuntu Servers. Monit would not install from the POB Recipe we have been using successfully, but instead fail with the below error:
Here is how we solved it in case someone else is having a similar error:
Today we got a weird error in one of the Ubuntu Servers. Monit would not install from the POB Recipe we have been using successfully, but instead fail with the below error:
$ ./configure --prefix=/usr/sbin --bindir=/usr/sbin --sysconfdir=/etc/monit/
...
checking for static SSL support... disabled
checking for SSL support... enabled
checking for SSL include directory... /usr/include
checking for SSL library directory... Not found

Couldn't find your SSL library files.
Use --with-ssl-lib-dir option to fix this problem or disable the
SSL support with --without-ssl
...
The only explanation for these inconsistencies is actually not managing the servers through recipes. With time the manual actions done in certain servers are different than in others.
Here is how we solved it in case someone else is having a similar error:
$ ./configure --prefix=/usr/sbin --bindir=/usr/sbin --sysconfdir=/etc/monit/ --with-ssl-lib-dir=/usr/lib/x86_64-linux-gnu
...
checking for static SSL support... disabled
checking for SSL support... enabled
checking for SSL include directory... /usr/include
checking for SSL library directory... /usr/lib/x86_64-linux-gnu
...
So try to keep your actions as sysadmin versioned in scripts which at the same time access versioned configurations. Then deploy always from scripts/recipes to have consistent environments.
Mount CIFS or NFS from a POB Recipe
I have packaged these so frequent actions in a couple of bash scripts: mount-cifs.sh and mount-nfs.sh
As a reminder you can run this scripts directly from root or you can use remoto-it to run them remotely in your servers.
As a reminder you can run this scripts directly from root or you can use remoto-it to run them remotely in your servers.
Tuesday, September 25, 2012
Jasper Reports from XML Datasource : Rendering the Enterprise Hierarchical Data
Data is hierarchical by nature. Whether you model it with a relational database or a noSql database (it looks like nowadays anything non sql92+ compliant is simply noSQL and you do not need to talk about the big differences about graph, OO, XML and more) the fact is you need to report out of that data.
Your hierarchical data (did I say that any report will ultimately render hierarchical data?) can be rendered with the help of iReport at Design time and JasperReports at runtime. A combination of XML+XPATH and sub-reports will do the job for us.
Here is a showcase to illustrate how to build a report which parses a potentially big XML containing several companies to extract employees and their contacts. The source code can be downloaded from https://nestorurquiza.googlecode.com/svn/trunk/jasper-reports/xml-report/
The key here is to understand that you need a datasource per report and so to show hierarchical data you will need sub-reports. We will use bands which will result in rendering all nodes matching the xpath provided. Probably using tables for rendering tabular data is a better idea but for simple reports this should be enough.
- Create an XML datasource pointing to the file (In our case companies.xml)
- Check "Use the report XPath expression when filling the report" option Use as name the file for example "companies.xml"
- Go to File|New|Report|Blank|Open this template and name the report something like "employee"|Next Finish
- From the left pane remove all bands (right click|delete band) but the "title", "column header" and "detail" bands. Choose as title "Employees"
- Click om the Report Query button (database with arrow icon) | Xpath as query language. On the right pane of the Report Query Window drill down until you find the node containing the fields to present, in this case "employee". Right click and select "Set record node (generate xpath)". The text "/companies/company/employees/employee" appears as a result and you can see the selected nodes are 2. Drag name and phone to the fields pane and click OK.
- On the left pane (Report Inspector) the fields are now accessible. Drag and drop them in the details band. Two labels appear in the Column header band and two fields appear in the details band. Adjust the height of the two bands so they do not take more space than needed by a typical row
- Click on Preview and the two employees will show up. Now let us jump into the subreport to show the contacts below each employee
- Create a new report as explained before but name it "employee_contacts". Use as title "Contacts". Use as Datasource root the "contact" node (note the xpath is now /companies/company/employees/employee/contacts/contact) and drag and drop the name and phone for that node. Use as Title "Contacts".
- Hit Preview and note we have a problem, we are not filtering by a specific employee name. Let's go back to the Report Query and change the xpath to "/companies/company/employees/employee[@name='$P{employee_name}']/contacts/contact"
- In Report Inspector pane create a Parameter called "employee_name". Hit Preview and you will be prompted for an employee name. Pick John or Paul to get content back.
- Go back to the "employee" report and expand the details band so there is space for the "employee_contacts" subreport.
- Drag and drop the Subreport component from the Palette pane into the details band. Select "Use existing subreport" and point to "employee_contacts.jasper", click next to accept "Use the same connection used to fill the master report". Click next. For the parameter expression pick from the dropdown "name field" (F${name}) which is the employee name. Use option for absolute path and click Finish.
- Clicking preview at this point at least in version 4.1.2 will end in the below error, reason why we migrated to 4.1.7:
Error filling print... null java.lang.NullPointerException at net.sf.jasperreports.engine.fill.JRPrintBand.addOffsetElements(JRPrintBand.java:101) at net.sf.jasperreports.engine.fill.JRFillElementContainer.addSubElements(JRFillElementContainer.java:623) at net.sf.jasperreports.engine.fill.JRFillElementContainer.fillElements(JRFillElementContainer.java:600) at net.sf.jasperreports.engine.fill.JRFillBand.fill(JRFillBand.java:406) at net.sf.jasperreports.engine.fill.JRFillBand.fill(JRFillBand.java:352) at net.sf.jasperreports.engine.fill.JRVerticalFiller.fillColumnBand(JRVerticalFiller.java:2023) at net.sf.jasperreports.engine.fill.JRVerticalFiller.fillDetail(JRVerticalFiller.java:755) at net.sf.jasperreports.engine.fill.JRVerticalFiller.fillReportStart(JRVerticalFiller.java:265) at net.sf.jasperreports.engine.fill.JRVerticalFiller.fillReport(JRVerticalFiller.java:128) at net.sf.jasperreports.engine.fill.JRBaseFiller.fill(JRBaseFiller.java:836) at net.sf.jasperreports.engine.fill.JRFiller.fillReport(JRFiller.java:118) at net.sf.jasperreports.engine.JasperFillManager.fillReport(JasperFillManager.java:435) at net.sf.jasperreports.engine.JasperFillManager.fillReport(JasperFillManager.java:271) at com.jaspersoft.ireport.designer.compiler.IReportCompiler.run(IReportCompiler.java:991) at org.openide.util.RequestProcessor$Task.run(RequestProcessor.java:572) at org.openide.util.RequestProcessor$Processor.run(RequestProcessor.java:997) Print not filled. Try to use an EmptyDataSource...
- open the XML and add to subreport node below the declaration for report element node:
<subreportParameter name="XML_DATA_DOCUMENT">
<subreportParameterExpression>$P{XML_DATA_DOCUMENT}</subreportParameterExpression> - Remove the absolute path and use just relative path. You can also remove the below node:
<connectionExpression><![CDATA[$P{REPORT_CONNECTION}]]></connectionExpression> - Go back to the Designer Editor and make sure it shows up as parameter. I have found sometimes it does not in which case closing and opening the properties editor or saving xml and switching to Designer or just closing and opening the report will restore it. For this subreport we have two parameters as the jrxml shows.
- Here are a couple of screenshots of how it looks locally for me:


- To invoke the report from java using the JasperReports library you go like
Document document = JRXmlUtils.parse(xmlFile);               reportParameters.put(JRXPathQueryExecuterFactory.PARAMETER_XML_DATA_DOCUMENT, document);
jasperPrint = JasperFillManager.fillReport(jasperFilePath, reportParameters);


Friday, September 21, 2012
Solaris Monit installation from POB recipe - Unattended Security Installation
Use reinstall-monit-solaris10.sh POB Recipe together with Remoto-IT or directly as root in your server to install a specific monit version in an unattended and secure way. The script should be idempotent BTW.
Here is how to call it locally to install version 5.5:
Here is how to call it locally to install version 5.5:
./reinstall-monit-solaris10.sh 5.5
Thursday, September 20, 2012
SSH Sessions in multiple tabs from one command
Seriously, aren't you tired of typing or clicking hundreds of times to get to hundreds of remote linux machines? Well I got tired today and I have to confess I barely interact with less than a dozen of them and only when there are serious issues. I cannot imagine what the life of those issuing commands the whole day to linux servers can be without having a way to open up connections to a whole farm of servers from just one command.
I created run-in-tabs.sh which only works for the gnome-terminal. You can do similar stuff with iTerm or plain Terminal plus Applescript in OSX even though that is out of the scope of this post as I am trying to push the team to work with Desktops that are closer to the servers where the applications are hosted.
Suppose you have server1 accessible, server2 and server 3 accessible from server1 and server 4 only accessible from 3 and 2. It is not hard to find this kind of situations especially in environments where security must be put in place with scarce resources. What do you do?
- Download the script.
- Create wrappers for your SSH connections especially if they are multi-hop
- Include the commands in a file like billing-environment.txt
#billing-environment.txt

#A simple direct ssh
ssh -t user@server1
#Wrapped (for simplicity) ssh commands
/home/nestor/ssh-billing-server2.sh
/home/nestor/ssh-billing-server3.sh
/home/nestor/ssh-billing-server4.sh
#A complex direct ssh equivalent to /home/nestor/ssh-billing-server4.sh
#ssh -t user@server1 \"ssh -t server2 \"ssh -t server4\"\"
Here is for example /home/nestor/ssh-billing-server4.sh:ssh -t user@server1 "ssh -t server2 \"ssh -t server4\""
- Run just one command and get the 4 tabs with an ssh session to a different server each:
$ ./run-in-tabs.sh billing-environment.txt
Using monit instead of cron for scheduling high frequency tasks
Monit can be actually used for more than just monitoring. Let us consider the following scenario: You need to schedule a task to run every minute (for example shipping logs from one server to another via rsync), you want to receive a notification if it fails but if there is a networking issue you do not want to receive an alert every minute for an hour disruption. Instead it would be ideal to receive just one alert when it fails and just receive another when the service is back to normal. Crontab would do the work only partially as you either will need to live with receiving an execution error every minute or code yourself some kind of counter logic to make sure cron won't bombard you with hundreds or thousands of messages.
Here is what I ended up doing. I just removed from cron the commands I needed to run. If there is an error running a command monit will alert and it will not do it again until the script runs without errors to inform everything is back to normal:
Here is what I ended up doing. I just removed from cron the commands I needed to run. If there is an error running a command monit will alert and it will not do it again until the script runs without errors to inform everything is back to normal:
#!/bin/bash -e
#
# name: /sbin/update-logs-in-log-server.sh
# date: 20120919
# author: Nestor Urquiza
#
su sampleadmin -c 'rsync -avz -e "ssh -i /home/sampleadmin/.sample-logs_rsa" /opt/tomcat/logs/sample-app.log logsviewer@sample.com:/home/logsviewer/remotelogs/sample-app.log > /dev/null'
su sampleadmin -c 'rsync -avz -e "ssh -i /home/sampleadmin/.sample-logs_rsa" /opt/talend/log/talend.log logsviewer@sample.com:/home/logsviewer/remotelogs/talend.log > /dev/null'
Of course you do not need monit if all you do is to run a program once a day (albeit you can use it there as well as monit supports cron syntax) but if the program runs multiple times in a day or specially in an hour you will definitely save \a lot of email cleaning/inspecting time.
Multi-hop SSH
If you are constantly ssh-ing into boxes you better automize a little bit your daily work, especially if to get to some of them you have to go through multiple hops.
You can generate and authorize keys from one server to the other and then later on issue a command like:
You can BTW open several of these complex connections from just one command in multiple tabs in your terminal application. Here is how to do it in gnome.
You can generate and authorize keys from one server to the other and then later on issue a command like:
ssh -t user@firstHost "ssh -t secondHost \"ssh -t thirdHost\""You can even use Remoto-IT to deploy the above POB Recipes remotely in multiple servers.
You can BTW open several of these complex connections from just one command in multiple tabs in your terminal application. Here is how to do it in gnome.
Wednesday, September 19, 2012
Monit reinstallation in Ubuntu from a POB Recipe
It sucks to do updates in multiple servers but if you build a POB recipe (idempotent enough) you can install anything in seconds.
Use reinstall-monit-ubuntu-x86_64.sh POB Recipe together with Remoto-IT or directly as root in your server to make sure you install a non-fake specific monit version. The script should be idempotent BTW.
Here is how to call it locally to install version 5.5:
Use reinstall-monit-ubuntu-x86_64.sh POB Recipe together with Remoto-IT or directly as root in your server to make sure you install a non-fake specific monit version. The script should be idempotent BTW.
Here is how to call it locally to install version 5.5:
$ sudo ./reinstall-monit.sh 5.5 8276b060b3f0e6453c9748d421dec044ddae09d3e4c4666e13472aab294d7c53
Saturday, September 15, 2012
Ubuntu from USB drive and wireless support in Dell Inspiron 1545
Nowadays I install OS from USB whenever I can. Most of the time the installation would be straightforward but Dell and its Broadcom wireless cards are still a problem just because of licencing issues.
Today I helped a family member with his Inspiron 1545 and here is the story of that Journey"
Today I helped a family member with his Inspiron 1545 and here is the story of that Journey"
- Insert USB with Ubuntu
- Start the "Additional Drivers" application (Search for "Driver" from "Dash Home" application, the first icon with the Ubuntu Logo).
- The "Broadcom STA wireless driver" was found in my case. Select "Acrivate", I got:
Sorry. installation of this driver failed. Please have a look at the log files for details: /var/log/jockey.log A quick look of the jockey.log revealed: 2012-09-15 19:30:56,301 ERROR: Package fetching failed: Failed to fetch cdrom:[Ubuntu 12.04.1 LTS _Precise Pangolin_ - Release amd64 (20120823.1)]/pool/main/d/dkms/dkms_2.2.0.3-1ubuntu3_all.deb Unable to stat the mount point /media/cdrom/ - stat (2: No such file or directory) Sorry. installation of this driver failed. Please have a look at the log files for details: /var/log/jockey.log
A quick look of the jockey.log revealed:2012-09-15 19:30:56,301 ERROR: Package fetching failed: Failed to fetch cdrom:[Ubuntu 12.04.1 LTS _Precise Pangolin_ - Release amd64 (20120823.1)]/pool/main/d/dkms/dkms_2.2.0.3-1ubuntu3_all.deb Unable to stat the mount point /media/cdrom/ - stat (2: No such file or directory)
- Of course the problem here is that a cdrom is expected but we are using a usb device. Take a look at /media directory and you should see the name of the USB device (In my case UBUNTU) so a simple symlink will help:
sudo ln -s /media/UBUNTU /media/cdrom
- Now you should be able to activate the driver now as explained above
- Once the driver is installed delete the shortcut we created:
sudo rm /media/cdrom
- You might want to restart and use the fn+f2 combination to get to the BIOS, select wireless and disable the wireless hardware switch to avoid wireless disconnections.
Thursday, September 13, 2012
Monitor big files in linux servers
You can proactively use this script to be informed whenever things go wrong. Here are some examples:
$ ./assert-no-big-files.sh 1G
-rw-r----- 1 root adm 3.3G Sep  9 06:27 /var/log/apache2/mod-jk.log.1
-rw-r----- 1 root adm 3.3G Sep 13 11:50 /var/log/apache2/mod-jk.log.todelete
$ ./assert-no-big-files.sh 1000M
-rw-r----- 1 root adm 3.3G Sep  9 06:27 /var/log/apache2/mod-jk.log.1
-rw-r----- 1 root adm 3.3G Sep 13 11:50 /var/log/apache2/mod-jk.log.todelete
$ ./assert-no-big-files.sh 1000000k
-rw-r----- 1 root adm 3.3G Sep  9 06:27 /var/log/apache2/mod-jk.log.1
-rw-r----- 1 root adm 3.3G Sep 13 11:50 /var/log/apache2/mod-jk.log.todelete
I have found monit very useful on this as it will send an alert when the issue is detected while it will not send it again until is back to normal. Just build a wrapper to look let us say for files bigger than 250MB:
#!/bin/bash -e
# assert-no-files-bigger-than-250MB.sh
/bin/assert-no-big-files.sh 250M
Then add the script to monit:
#################################################################
#Big files
################################################################
check program assert-no-files-bigger-than-250MB with path "/bin/assert-no-files-bigger-than-250MB.sh"
  if status != 0 then alert
Apache log rotation: when things go wrong
There was a time a mod-jk.log file got to 3.3GB because of a miss configuration (someone forgot to revert back to error level from trace level.
In linux is easy to rotate any logs and for apache in particular in this Ubuntu server we have:
In linux is easy to rotate any logs and for apache in particular in this Ubuntu server we have:
$ cat /etc/logrotate.d/apache2
/var/log/apache2/*.log {
 weekly
 missingok
 rotate 52
 compress
 delaycompress
 notifempty
 create 640 root adm
 sharedscripts
 postrotate
  /etc/init.d/apache2 reload > /dev/null
 endscript
 prerotate
  if [ -d /etc/logrotate.d/httpd-prerotate ]; then \
   run-parts /etc/logrotate.d/httpd-prerotate; \
  fi; \
 endscript
}
This means every week the log will be gzipped and rotated, then recycled after number 52 is reached. However a week will be too much for a trace level. To correct this problem be sure mod-jk is configured to log as error then without disruption you can proceed as follows:
$ sudo vi /etc/logrotate.d/apache2
...
#replacing:
#JkLogFile /var/log/apache2/mod-jk.log
JkLogFile "|/usr/sbin/rotatelogs /var/log/apache2/mod-jk.log 86400"
...
$ sudo mv /var/log/apache2/mod-jk.log /var/log/apache2/mod-jk.log.todelete
$ sudo apachectl configtest
$ sudo apachectl graceful
$ sudo vi /etc/logrotate.d/apache2
...
#reverting:
JkLogFile /var/log/apache2/mod-jk.log
#JkLogFile "|/usr/sbin/rotatelogs /var/log/apache2/mod-jk.log 86400"
...
$ sudo apachectl configtest
$ sudo apachectl graceful
Take a look at how to avoid this issues through monit.
Quartz scheduler instance is still active but was recovered by another instance in the cluster
When scheduling tasks we should be sure clocks are synchronized across servers. I have seen so many issues because of clock synchronization that I am still surprised to see how small attention is put on server time synchronization. From security vulnerabilities exploits to serious business logic erros resulting in money loss the error always hits you hidden behind words like:
2012-09-12 19:13:09,193 WARN [org.springframework.scheduling.quartz.LocalDataSourceJobStore] - This scheduler instance (bhub-test11347491427777) is still active but was recovered by another instance in the cluster. This may cause inconsistent behavior.And of course a simple ntpdate configuration will solve the issue. This ntpdate configuration can be deployed remotely in all your servers using Remoto-IT and a POB Recipe similar to the below:
#!/bin/bash -e
# ntp.sh

cd /etc/cron.daily
#assuming you have your configuration files on SVN, aren't you versioning your changes yet?
svn export http://svn.sample.com/environment/common/scripts/etc/cron.daily/ntpdate
chmod 755 ntpdate
ntpdate ntp.ubuntu.com pool.ntp.org
Here is how the ntpdate file looks like:
#!/bin/sh
#Please do use an internal NTP server for security reasons!
ntpdate ntp.ubuntu.com pool.ntp.org > /dev/null
Of course if the cron fails you should get an email so be sure MAIL_TO is working in cron.
Tuesday, September 11, 2012
Monitor your MySQL or MSSQL servers heartbeat
It is a central piece of most applications nowadays and yet you discover the DB is down because some other alert about a failing service or even worse from your client.
Here is a simple POB script to help you check the health of your MSSQL or MYSQL server.
If you want alerts you could just cron the script and on failure you will get an error in the email address configured in the MAILTO option however a more sophisticated and better approach (for one you will receive the alert just once and after corrected you will get feedback about the issue been solved) is to call the script from Monit for example as in:
#################################################################
#REMOTE MSSQL CHECK
################################################################
check program ssql-heartbeat with path "/bin/sql-heartbeat.sh"
  if status != 0 then alert
Naturally /bin/mssql-heartbeat.sh will need to have 700 permissions and owned by root as credentials will be kept inside. Here is an example of such wrapper:
#!/bin/bash -e
/bin/sql-heartbeat.sh MSSQL myserver.mydomain.com heartbeatUser heartbeatPassword
Feel free to modify the heartbeat script to customize the database for example in case you want to be sure a specific db is available.
Reinitializing monit daemon monit: No daemon process found
So here is the issue I faced today:
As monit is installed as a service if such service is stopped the reload command would do nothing. So first the service should have been started:
As a reminder "/usr/sbin/service " is equivalent to call "/etc/init.d/ " so the below is perfectly fine as well:
$ sudo monit reload
Reinitializing monit daemon
monit: No daemon process found
However "monit -Iv" would show monit able to read the configuration file and send alerts correctly.
As monit is installed as a service if such service is stopped the reload command would do nothing. So first the service should have been started:
sudo service monit startThe way monit restarts automatically is through a /etc/init.d/monit which sources the /etc/default/monit where in turn "startup=1" sets if monit should automatically start after system reboot.
As a reminder "/usr/sbin/service
sudo /etc/init.d/monit restartThere is one word of advise though. If you faced this issue be sure 'which monit' resolves to the same monit version in use when you call monit as a service. I have found dual installations in /usr/bin and /usr/local/bin perhaps related to ".configure" problems when installing monit from sources.
Monday, September 10, 2012
Security: Print context variables in Talend
The Talend tContextLoad component has a 'Print operations' option which should be used with caution. You could be revealing passwords in your log files otherwise.
In reality the "context" variable is accessible from Java as a regular java.util.Property object so you can get a greater control as to what to print or log but you have also "Advanced Settings" which you can use to state things like:
Here you can find a project that illustrates the two alternatives. Remember that Security must be a top priority in your app.
In reality the "context" variable is accessible from Java as a regular java.util.Property object so you can get a greater control as to what to print or log but you have also "Advanced Settings" which you can use to state things like:
!(key_tContextLoad_1.contains("pass") || key_tContextLoad_1.contains("pwd"))
Which as you guessed is trying to exclude anything containing password related paramter keys.
Here you can find a project that illustrates the two alternatives. Remember that Security must be a top priority in your app.
Talend and SQL Transactions
It would be great if when setting a Talend Connection to a Database the "Auto Commit" setting in Advanced Settings of the tMySQLConnection would drive more in the rest of the components using such connection. Unfortunately at least for the tMySQLRow component that is not true.
I started putting together a proof of concept to demonstrate a bug in Talend Open Studio Version: 4.2.3 tMysqlRow component. Basically it does not support transactions.
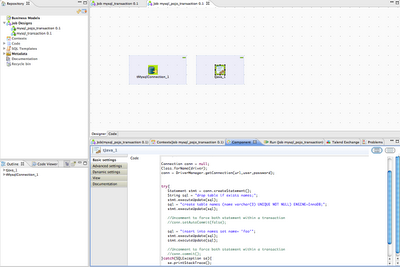
So here is a project with two jobs. The first called "mysql_pojo_transaction" just uses JDBC while the second called "mysql_transaction" uses tMySQLRow to insert two identical records (just a name column) in table "names" in a mysql "test" database.
Using "mysql_transaction" project I was expecting to check and uncheck Autocommit checkbox from Advanced settings in the tMysqlConnection and see how a record will exist in "names" table only when autocommit is checked. However a record will exist there in any case:
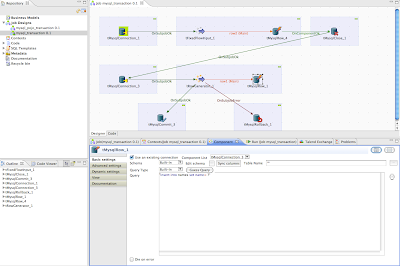
Using "mysql_pojo_transaction" project and commenting out setAtocommit, commit and rollback lines will result in one record while uncommenting results in no records. This would be the expected behaviour in tMySQLRow I guess:
This project is useful as a test for a couple of reasons. First it shows how to prepare a test database from within talend without the need of external files (through the use of tFixedFlowInput which generates the statements to be run by a tMySQLRow component). Second it shows how to generate input data via tRowGenerator (Set schema with field "name", Use as Funtion "Talend Trim", use as Funtion Parameter origin the value "Foo". Clicking on Preview should show two rows with the word "Foo") without the need of extra files to insert records later on using again a tMysqlRow.
I started putting together a proof of concept to demonstrate a bug in Talend Open Studio Version: 4.2.3 tMysqlRow component. Basically it does not support transactions.
So here is a project with two jobs. The first called "mysql_pojo_transaction" just uses JDBC while the second called "mysql_transaction" uses tMySQLRow to insert two identical records (just a name column) in table "names" in a mysql "test" database.
Using "mysql_transaction" project I was expecting to check and uncheck Autocommit checkbox from Advanced settings in the tMysqlConnection and see how a record will exist in "names" table only when autocommit is checked. However a record will exist there in any case:

Using "mysql_pojo_transaction" project and commenting out setAtocommit, commit and rollback lines will result in one record while uncommenting results in no records. This would be the expected behaviour in tMySQLRow I guess:

This project is useful as a test for a couple of reasons. First it shows how to prepare a test database from within talend without the need of external files (through the use of tFixedFlowInput which generates the statements to be run by a tMySQLRow component). Second it shows how to generate input data via tRowGenerator (Set schema with field "name", Use as Funtion "Talend Trim", use as Funtion Parameter origin the value "Foo". Clicking on Preview should show two rows with the word "Foo") without the need of extra files to insert records later on using again a tMysqlRow.
Friday, September 07, 2012
POB script to assert if user quota is exceeded
Here is a Plain Old Bash (POB) script to assert the user quotas are OK. Should quotas exceed certain threshold provided as a parameter the script will return an exit code 1 with the description in stderr. Here is how to call it to find out who is using more than 85% space:
/usr/sbin/find-exceeded-quota.sh 85
Motivation
When trying to put a file via SFTP or creating a remote directory via SFTP we were getting:Couldn't write to remote file "filename": Failure Couldn't create directory: FailureIncreasing log level for SSH did not help to clarify the issue:
$sudo vi /etc/ssh/sshd_config
...
# Logging
SyslogFacility AUTH
#LogLevel INFO
LogLevel VERBOSE
...
$ sudo service ssh restart
However other user accounts did not show the issue. It ended up being related to the user quota in use where "used" was nearly the same as the "hard" setting:
sudo repquota -aThis simple POB script then can be used to check for certain percentage as explained. After getting the alert all the sysadmin will do is either delete files or increase quota:
sudo setquota -u user2 200000 200000 1500 1500 -a /It is a good idea to automatically delete of course old files if that is possible.
Subscribe to:
Posts (Atom)

